How to Recover Deleted Viber Messages and Calls on iPhone
In today's digital age, Viber has become an essential communication tool for many iPhone users, providing a convenient way to stay connected through messages and calls. However, losing your Viber chat history, including important messages and call logs, can be a frustrating experience. Whether due to accidental deletion, a software update, or switching to a new device, losing valuable data is a common concern. Fortunately, recovering iPhone Viber messages and call history is possible through a few straightforward methods. In this guide, we'll explore step-by-step processes to help you efficiently restore your important Viber data, ensuring you never miss out on essential information.Before you begin the process of recovering your iPhone Viber messages and call history, it's essential to take certain preliminary steps and considerations into account. These measures will help ensure a smooth and successful recovery process. Here are some key points to keep in mind:
1. Ensure that you have been regularly backing up your Viber data either to iCloud or another cloud storage service.
2. Check that your iPhone has sufficient storage space to accommodate the restored data.
3. Ensure a stable and strong internet connection to avoid interruptions during the recovery process.
4. Confirm that you have the latest version of the Viber app installed on your iPhone to prevent compatibility issues.
By keeping these considerations in mind, you'll be better prepared to recover your Viber messages and call history efficiently and effectively.
Method 1: Recover Viber Messages and Calls from iPhone Directly
iPhone Data Recovery is a comprehensive data recovery software designed to retrieve lost or deleted data from iPhone, iPad, and iPod devices. The software supports the recovery of a wide range of data types, including Viber messages, call history, photos, videos, contacts, SMS, and WhatsApp messages. With its intuitive user interface, users can effortlessly navigate and perform data recovery through multiple modes, such as recovering from iOS devices, iTunes backups, or iCloud backups. Its advanced scanning technology ensures a high recovery success rate, while the data preview feature allows for selective recovery, making it an essential tool for those who need to recover critical information efficiently and securely.Key Features of iPhone Data Recovery Tool
1. Three recovery mode to restore up to 22+ different types of data.2. Preview the recoverable data before the recovery process.
3. Fix various iOS system issues like recovery mode, white Apple logo, black screen, looping on start without data loss.
4. Safely back up any iOS device and restore data from previous backups whenever needed.
5. Transfer WhatsApp messages between two iOS devices.
6. Fully compatible with the latest iOS version and support for all iOS devices including iPhone 15 Pro Max/Plus/14/13/12/11, iPad, and iPod Touch.
Steps to Recover iPhone Viber Messages and Call History
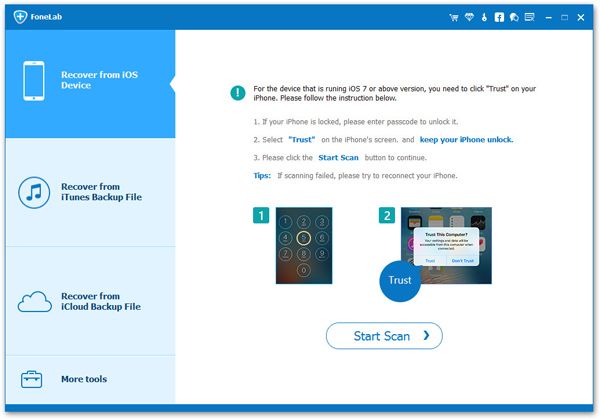
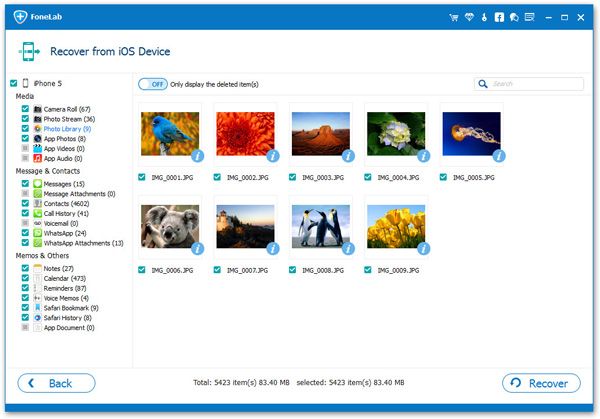
Step 1. Download and install the iPhone data recovery software on your computer, launch it. Connect your iPhone to the computer using a USB cable, press "Trust" on iPhone screen. Choose "iPhone Data Recovery" mode and the software will go to default recovery mode "Recover from iOS Device", you can see the software display your iPhone info, you can click "Start Scan" to scan your iPhone storage.
Method 2: Recover Viber Messages and Calls from iTunes Backup
A. Extract iTunes Backup for Viber Messages and Calls
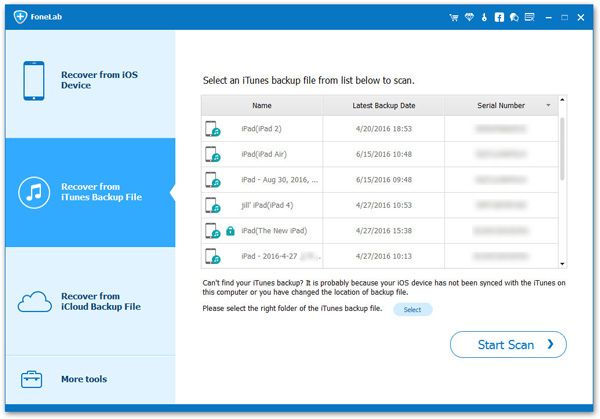
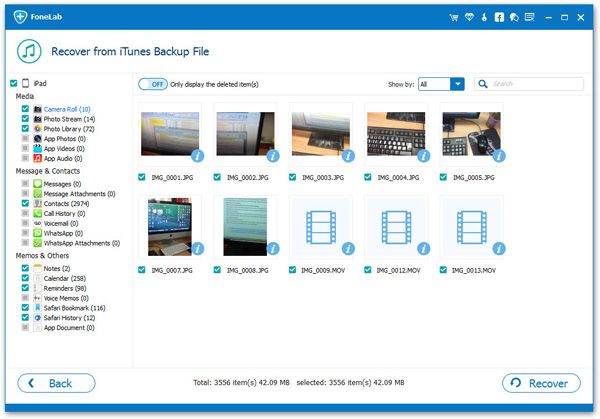
When you accidentally delete your Viber messages or calls, or if they become inaccessible due to any technical glitches, recovering them from an iTunes backup is a viable solution. Below are the steps to restore Viber messages and call history from iTunes backup selectively by using iPhone data recovery software.Step 1. Launch the iPhone data recovery software on your computer. Choose "iPhone Data Recovery" feature and select "Recover from iTunes Backup File" mode from the new interface. The software will automatically detect all iTunes backup files on your computer. Choose the backup file you want to restore from and click "Start Scan."
B. Restore Whole iTunes Backup for Viber Messages and Calls
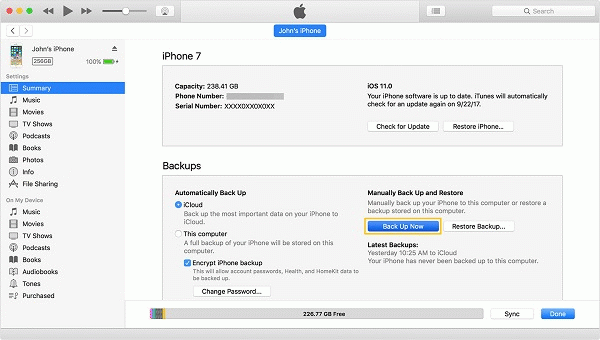
Using iTunes to restore your Viber messages and calls is a reliable option when your data gets deleted or lost due to unforeseen issues. However, it’s important to note that this method has its drawbacks. Restoring from an iTunes backup will overwrite your current device data with the data from the backup, meaning any new data that you've added since the last backup could be lost. Here is how to recover Viber messages and calls from an iTunes backup:Step 1. Open iTunes on your computer and connect your iPhone using a USB cable.
Step 2. Click on the device icon in the upper left corner of iTunes.
Step 3. Go to the "Summary" tab and click "Restore Backup."
Step 4. Select the relevant backup file which contains your Viber data from the pop-up menu.
Step 5. Click "Restore" and wait for the process to complete. Your iPhone will restart after the restoration.
Method 3: Recover Viber Messages and Calls from iCloud Backup
A. Extract iCloud Backup for Viber Messages and Calls
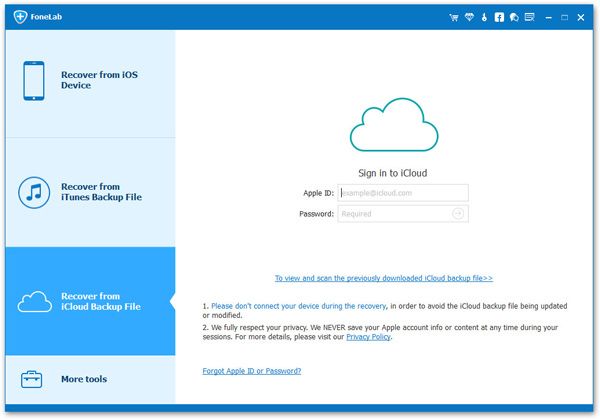
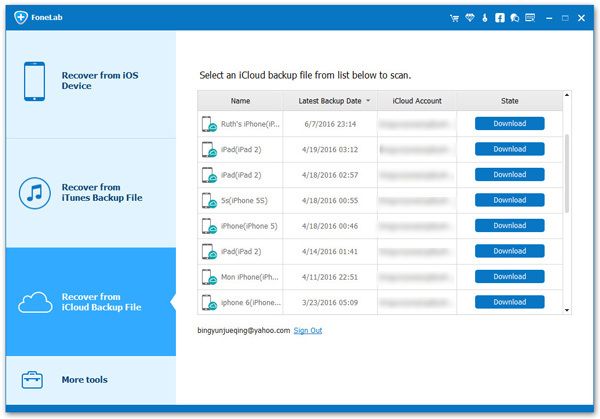
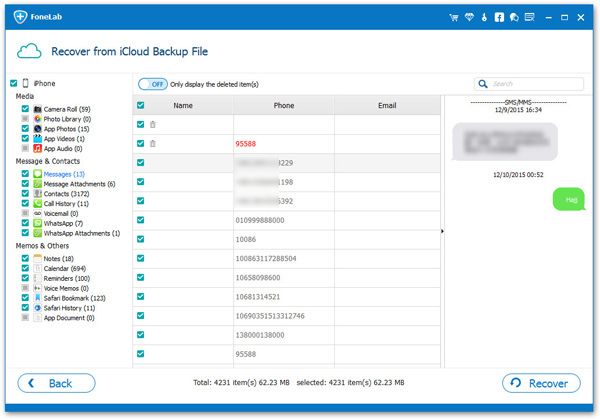
When you need to recover Viber messages and calls from an iCloud backup without overwriting your current iPhone data, iPhone data recovery provides a viable solution. This method allows you to selectively restore specific data from your iCloud backup. Follow these steps to extract and recover your Viber messages and calls using iPhone data recovery:Step 1. Open iPhone data recovery tool and choose "iPhone Data Recovery" feature, select recovery mode "Recover from iCloud Backup File" from the interface. Enter your Apple ID and password to log into your iCloud account within the software.
B. Recovering Viber Messages and Calls from Whole iCloud Backup
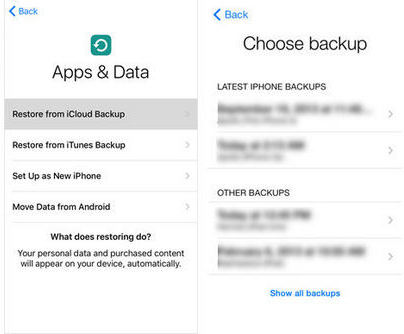
Restoring Viber messages and calls from an iCloud backup is a convenient and efficient method if you have been regularly backing up your iPhone to iCloud. However, it's important to know that this method will require you to reset your iPhone, erasing any new data added since your last backup. Ensure you back up your current data before proceeding. Here’s how to recover your Viber messages and calls from an iCloud backup:Step 1. Go to Settings > General > Reset on your iPhone, then tap "Erase All Content and Settings."
Step 2. Once the reset process is complete, your iPhone will restart and you will see the setup screen. Follow the setup instructions until you reach the Apps & Data screen.
Step 3. On the Apps & Data screen, choose "Restore from iCloud Backup."
Step 4. Enter your Apple ID and Password to sign in to iCloud and select the backup that contains your Viber data.
Step 5. Your iPhone will start restoring from the selected backup. This may take some time depending on the size of the backup and your internet connection speed.
Step 6. Once the restore process is complete, download and install the Viber app from the App Store.
Method 4: Using Viber's Built-in Recovery Feature (If Available)
Viber provides its own built-in feature to backup and restore data, making it a convenient option for retrieving lost messages and call history. This method is integrated directly into the app, allowing users to restore their data without needing any third-party tools.How to Use Viber’s Native Features to Restore Data
Step 1. Launch the Viber app and go to the "More" (three dots) icon.Step 2. In the settings menu, select "Viber Backup."
Step 3. Tap the "Restore" button if a backup exists and follow the prompts.
Step 4. Wait for the process to complete and check your messages and call history.
Limitations and Advantages
Advantages:1. Ease of Use: Straightforward process with no additional software needed.
2. Integration with Cloud Services: Works seamlessly with iCloud.
3. No Additional Cost: Free and doesn’t require third-party tools.
Limitations:
1. Dependence on Regular Backups: Requires regular backups for effectiveness.
2. Limited Control: Limited to the most recent backup.
3. Incomplete Recoveries: Some messages or logs may not be fully restored.
4. Device-Specific:bMay not work when switching between different device types (e.g., iPhone to Android).
How to Backup iPhone Viber Messages and Calls
Backing up your Viber messages and call history on your iPhone is crucial to ensure you don’t lose important conversations and data. Here’s a simple guide to help you backup your Viber data effectively.Step 1. Launch the Viber app on your iPhone.
Step 2. Tap on the "More" (three dots) icon at the bottom of the screen and then select "Settings."
Step 3. Within the settings menu, go to "Account" and tap on "Viber Backup."
Step 4. Ensure that you have iCloud enabled and signed in on your device.
Step 5. Tap on "Backup Now" to start the backup process. Wait until the process is complete.
Troubleshooting Common Issues
Restoring Viber messages and call history can sometimes encounter problems. Below are some common issues and their solutions to help you navigate through the recovery process smoothly.What to Do if the Recovery Fails
1. Check Internet Connection: Ensure that your iPhone is connected to a stable WiFi network.Restart Your Device: Sometimes, a simple reboot of your iPhone can resolve minor glitches.
2. Verify Backup Status: Check if the backup file is corrupted or incomplete. You may need to create a new backup if possible.
3. Update Viber: Make sure you are using the latest version of the Viber app. An outdated app can cause compatibility issues.
Addressing Compatibility Issues
1. Ensure Same Device Type: Viber backups are often tied to the same operating system. Ensure you are restoring on the same type of device (e.g., iPhone to iPhone).2. Update iOS: Sometimes, updating your iPhone to the latest iOS version can resolve compatibility problems.
3. Use Compatible Backup Services: Make sure the iCloud or other cloud service is properly set up and compatible with your device.
Tips for Maintaining Data Integrity During Recovery
1. Avoid Interruptions: Ensure a stable power supply and avoid using your phone during the recovery process.2. Regular Backups: Enable automatic Viber backups to keep your data up-to-date.
3. Verify Backup Before Recovery: Always check the backup file integrity before initiating a recovery process.
4. Secure Storage: Store your backup files in a secure location to prevent any potential data loss or corruption.
Recovering your iPhone Viber messages and calls doesn't have to be a daunting task. By choosing the right method, whether it's through iCloud, iTunes, or using specialized software, you can ensure that your important chat histories and call logs are safely restored whenever needed. Regular backups and familiarity with different recovery techniques are key to safeguarding your data. By following the steps outlined in this guide, you can confidently tackle any data loss situation and keep your Viber communications intact.


