5 Easy Methods to Retrieve Deleted Notes on iPad
Have you ever tapped 'delete' on your iPad, only to realize moments later that you've just erased the notes from last week's meeting or your treasured recipes? We've all been there, and the sinking feeling that follows is something we'd all like to avoid. But before you consign those notes to the digital abyss, let me share a nugget of hope: those lost words might not be lost for good. In this guide, I'm going to walk you through some straightforward steps to recover your deleted notes on your iPad Pro/Air/Mini. So, take a deep breath, grab your iPad, and let's turn back the digital clock to bring back your precious notes.To avoid making the situation worse and potentially losing your notes forever, you should be cautious and refrain from certain actions:
1. Don't Continue to Use the iPad
Avoid creating new notes, downloading apps, or taking photos and videos. Additional activity can overwrite the space where your deleted notes are, making recovery difficult.
2. Don't Perform a Factory Reset:
This will erase all data on your iPad, including any notes that might be recoverable.
3. Don't Restore From a New Backup:
Restoring from a backup made after the notes were deleted won't help in recovering them. Always choose the most relevant backup that definitely contains your lost notes.
4. Avoid Syncing With Caution:
If you believe your notes have disappeared due to a syncing issue, do not sync your device until you've checked all your accounts and devices for the missing notes.
5. Don't Panic and Rapidly Click Around:
Hasty actions might lead to accidental deletions or changes that cannot be undone. Take a moment to think through your actions.
By avoiding these actions, you can preserve the highest chances of successfully recovering your lost notes on your iPad.
Method 1: Recover iPad Notes from Recently Deleted Folder
To recover notes that you may have recently deleted, follow these steps:Step 1. Launch the Notes app on your iPad.
Step 2. In the app, navigate to the 'Folders' section. Look for the 'Recently Deleted' folder, which usually appears at the bottom of the list.
Step 3. Tap on 'Recently Deleted,' and you’ll see a list of notes that have been deleted within the last 30 days. Select the note or notes you want to recover.
Step 4. Once you’ve selected the notes, look for the 'Move To...' option which is likely found in the bottom-left corner or in the 'Edit' menu. Tap it.
Step 5. Decide where you want to move the recovered notes - either to an existing folder or create a new one. Once you have selected your desired folder, the notes will be moved out of the 'Recently Deleted' folder.
Step 6. Go to the folder you moved your notes to, and ensure they are now present.
Remember, notes can only be recovered from 'Recently Deleted' if they were deleted in the last 30 days. After this period, notes are permanently removed and cannot be recovered through this method.
Method 2: Recover iPad Notes from iCloud (Without Reset)
If you need to recover notes from iCloud, here's a detailed step-by-step guide:Step 1. Make sure your Notes app syncs with iCloud. In iPad settings, tap [your name], then 'iCloud'. Turn on 'Notes'.
Step 2. If a note is deleted, check iCloud.com. Sign in, open Notes, and check 'Recently Deleted'.
Step 3. In iCloud, click 'Notes' to see your notes.
Step 4. Search 'Recently Deleted' for the note. Or check other folders.
Step 5. Recover the note in 'Recently Deleted'. Or drag it back if in another folder.
Step 6. Wait for the note to sync to your iPad. Ensure internet connection and active iCloud sync.
Step 7. Check the Notes app on your iPad for the recovered note. Refresh or restart the app if needed.

Method 3: Restore iPad Notes via iTunes or Finder Backup
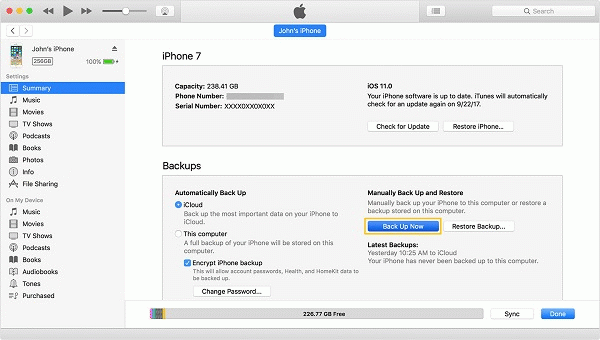
To restore your iPad notes from an iTunes or Finder backup, follow these simple steps:Step 1. Connect iPad to Computer:
Use your USB cable to connect your iPad to the computer where your iTunes backup is stored. If you're using macOS Catalina or later, open Finder; otherwise, open iTunes.
Step 2. Trust the Computer
If asked, trust the computer on your iPad and enter your passcode if prompted.
Step 3. Select Your iPad:
In iTunes, click on the iPad icon in the upper-left corner of the iTunes window.
In Finder, select your iPad in the sidebar under 'Locations'.
Step 4. Restore Backup
In iTunes, click on 'Summary', then 'Restore Backup'.
In Finder, click on 'General' (or 'Manage Backups'), then 'Restore Backup'.
Step 5. Choose Backup
Select the most relevant backup from the list (ideally, the one which contains the notes you want to restore). Click 'Restore' and wait for the process to complete without disconnecting your iPad.
Method 4: Using Third-Party Tool to Recover iPad Notes
iOS Data Recovery software is a comprehensive data recovery software specifically designed for Apple's iOS devices, including iPads. Its versatility allows users to recover lost or deleted data directly from their iOS devices, as well as extract information from iTunes and iCloud backups. With a user-friendly interface and powerful data recovery capabilities, it can be an essential tool for retrieving important notes and other data that you thought were gone forever.Key Feature of iOS Data Recovery Tool.
1. Recover from iOS Device:Enables users to recover lost data directly from their iPhone, iPad, or iPod touch.
Recovers a variety of data types such as contacts, messages, call history, notes, calendar, photos, and app data, etc.
2. Extract Data from iTunes Backup:
Allows users to preview and recover data from iTunes backup files.
Data can be extracted even if the iOS device is damaged or lost.
3. Recover from iCloud Backup File:
Provides functionality to download and recover data from iCloud backup.
Access and recover data from iCloud without a full device restore.
4. iOS System Recovery:
Fixes a variety of iOS system issues such as recovery mode loop, white Apple logo loop, etc., without data loss.
Comes with Standard Mode and Advanced Mode to cater to different levels of repair needs.
5. Data Backup & Restore:
Offers selective data backup and restore on iOS devices.
Supports one-click backup for the entire device or just selected data types.
6. WhatsApp Transfer, Backup & Restore:
Tailored management for WhatsApp data including messages and attachments transfer, backup, and restore.
These features provide users with flexibility in data recovery and system repair in case of data loss or device malfunction.
Here's how to use iOS data recovery tool to recover iPad notes:
I. Directly Recover Deleted Notes from iPad Storage
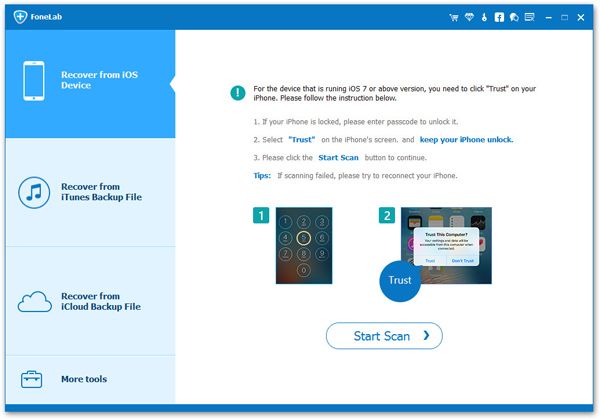
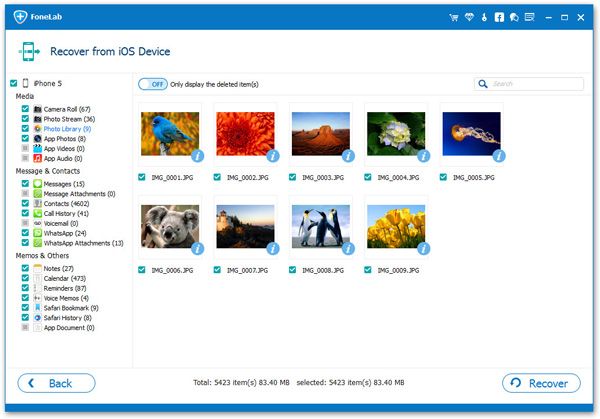
Step 1. Launch iOS data recovery tool on your computer. Connect your iPad to the computer using the USB cable. Trust the computer on your iPad if prompted. Then tap "iPhone Data Recovery" feature and select "Recover from iOS Device" recovery mode on the interface. Click 'Start Scan' to scan your iPad for recoverable data.
II. Extract iTunes Backup for iPad Notes:
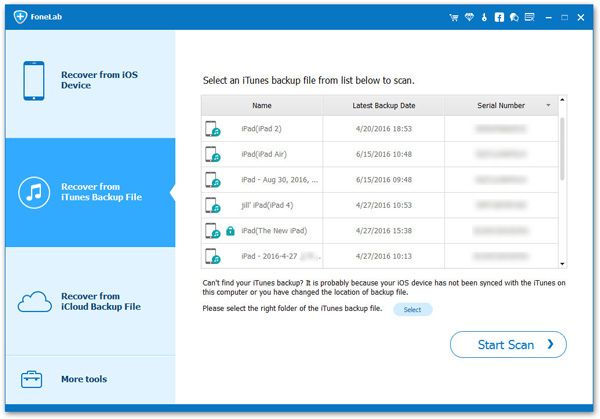
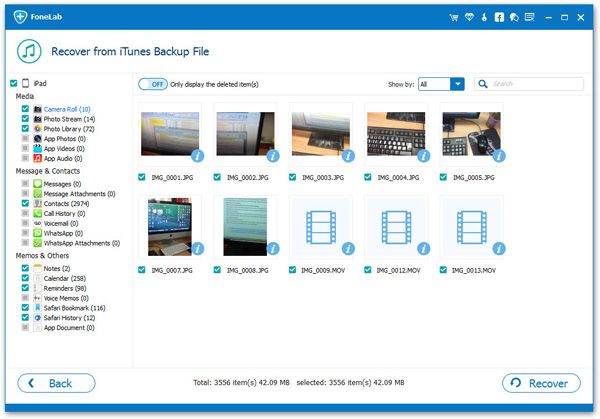
Step 1. Open iOS data recovery software on computer and tap "iPhone Data Recovery" feature. Click on "Recover from iTunes Backup File."Step 2. Select the relevant iTunes backup file from the list presented. Click 'Start Scan' to extract the data from the backup.
III. Extract iCloud Backup for iPad Notes:
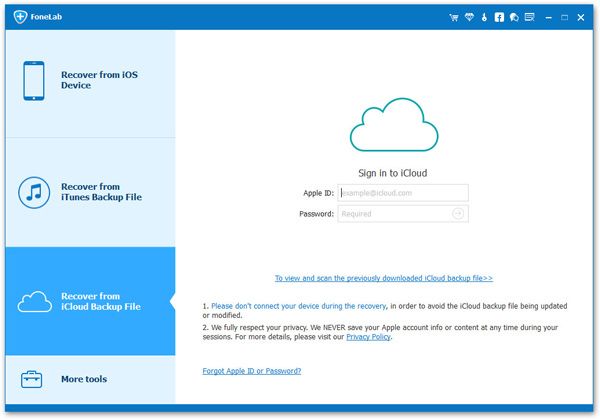
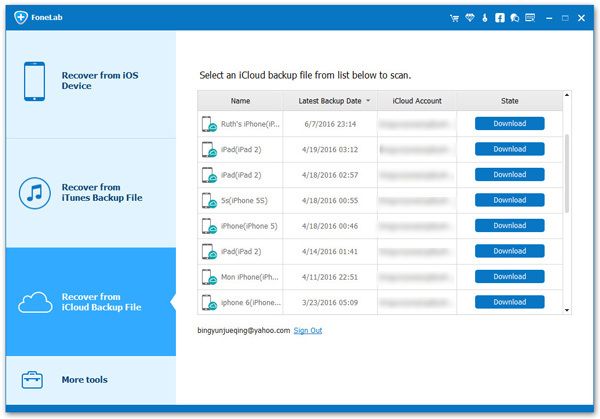
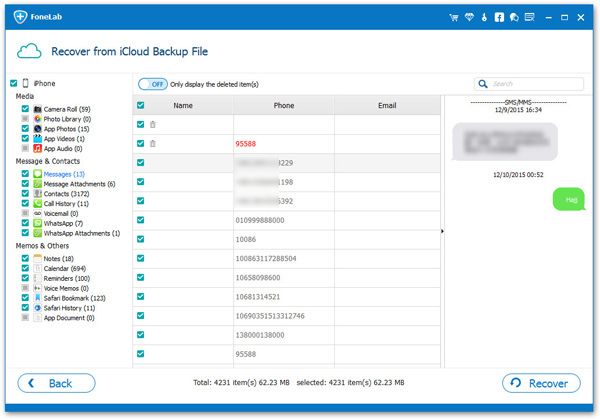
Step 1. Run iOS data recovery software on PC and go to "iPhone Data Recovery", then choose "Recover from iCloud Backup File." Enter your Apple ID and password to sign into iCloud.
Method 5: Check Out Other Cloud Storage Services
If you've been using other cloud services, such as Google Drive, Dropbox, or any similar platforms to sync your notes, it's a good idea to check these services to see if your notes data has been backed up there. Most cloud services automatically save versions of your files when changes are made, so there's a chance your notes could be retrieved from there if they're missing from your device.How to Avoid iPad Notes Loss
Losing the content of your notes on an iPad isn’t just frustrating; it can be downright disruptive, especially if those notes contain important information, personal memories, or critical work data. The reasons for such losses can vary widely, from accidental deletion to software updates gone wrong, or even device damage. There's also the potential risk of data loss due to synchronization issues, where changes might not properly reflect across all your devices.To safeguard against irreversible loss, taking proactive steps is key. Here are some preventive measures to ensure your notes remain accessible:
1. Regular Backups:
Make it a habit to back up your iPad data, including notes, to iCloud. This ensures that even if your device is lost or damaged, your data isn’t.
2. Use Multiple Cloud Services:
Don’t put all your digital eggs in one basket. Consider using other cloud storage services like Google Drive or Dropbox for an additional layer of backup.
3. Enable Auto-Sync:
If your note-taking app offers it, turn on auto-syncing. This ensures your notes are updated in real-time across all your devices.
4. Avoid Accidental Deletions:
Take a moment to double-check before you delete any notes. Some note applications have a confirmation step before deletion - don't rush through it.
5. Stay Updated:
Ensure your iPad and note-taking apps are always updated to the latest versions. Updates often include bug fixes that prevent data loss.
By incorporating these habits into your routine, you can significantly reduce the risk of losing your valuable notes and alleviate the headache of trying to recover them later.
In conclusion, whether your notes have vanished due to an accidental deletion or an unexpected glitch, the options outlined throughout our discussion offer a beacon of hope. From using the recently deleted folder in the Notes app to retrieving them via iCloud or iTunes, each method provides a safety net to ensure that your precious thoughts and information are not lost to the digital void. Remember to always keep backups via cloud services like iCloud, Google Drive, or Dropbox for an added layer of security. Armed with these tools and tips, you can rest easier knowing that your iPad notes have a way back home to you, safeguarding your digital memory for future reference.


